Passion Fruit Frozen Yogurt with Toasted Coconut and Dark Chocolate Magic Shell

Ugh, March. The month leaves a bitter taste in my mouth, not at all influenced by what I’m eating (which for the record is a diet primarily consisting of Cadbury Mini Eggs because that’s what Easter is all about for us agnostics).


The dreary cold month taunts us with a few spring-like days before dipping back into frosty mornings and lifeless grey skies. Unsavory memories emerge from the graves of Marches previous and linger like an impenetrable fog that suffocates me with thoughts of stress, heartbreak, unrelenting politics and loss. The clearer skies of April seem miles away. March calls for a ray of sun to ward away the ghosts of the past and for me, that sunlight 
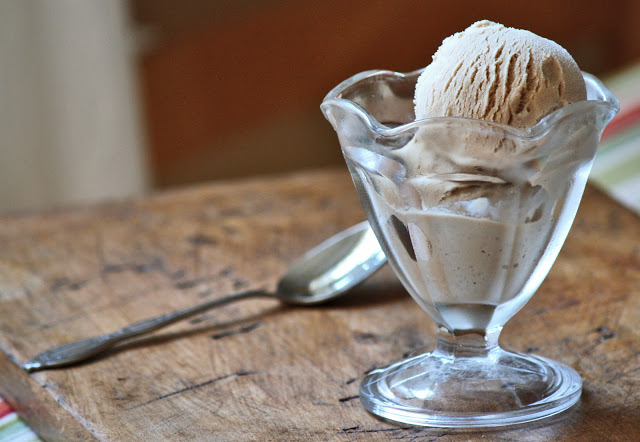
comes in the form of passion fruit frozen yogurt


Per usual, my frozen desserts come from the genius that is Jeni Britton Bauer. Her eggless creations allow for a clearer, brighter cream flavor and with her frozen yogurts, the tanginess of the yogurt really comes through without sacrificing a smooth and rich texture.


This frozen yogurt combines my three absolute favorite flavors: passion fruit, coconut, and chocolate.  The small amount of passion fruit juice that goes into the frozen yogurt still manages to permeate it with its intense tropical flavor and the acidity that comes from both the fruit and the yogurt make it more refreshing than a 
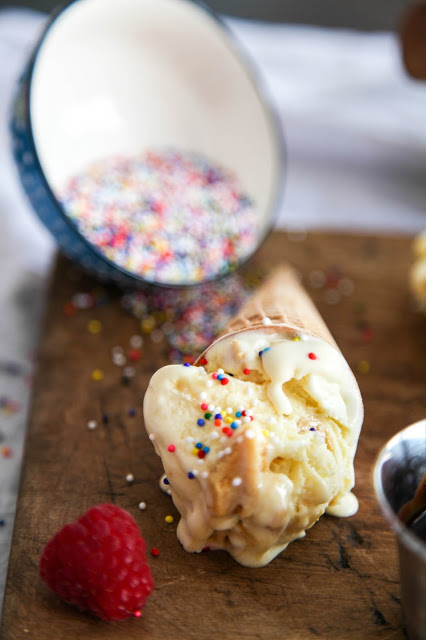
standard ice cream. Toasted coconut gives each bite some satisfying chew and a nutty depth of flavor while homemade dark chocolate magic shell (dark chocolate + coconut oil) tones down the bright sweetness of the passion fruit with a bit of bitterness.


Contradictory as it is, this frozen dessert, with it’s tropical and refreshing flavor, momentarily takes me to a place that is warm and sunny, where my winter coat can collect dust in the closet, and the dark worries and memories of the month can melt away for good. In the midst of March, it’s completely necessary. 

Passion Fruit Frozen Yogurt with Toasted Coconut and Dark Chocolate Magic Shell
Makes roughly a quart

Note: Pure passion fruit juice is a bit difficult to find but should be in the juice section at any Hispanic or Asian supermarket.

Ingredients
½ cup passion fruit juice
1¼ cups whole milk Greek yogurt
1½ cups whole milk
2 Tbs. cornstarch
2 oz. (4 Tbs.) cream cheese, softened
½ cup heavy cream
2/3 cup plus 3 Tbs. granulated sugar
¼ cup light corn syrup
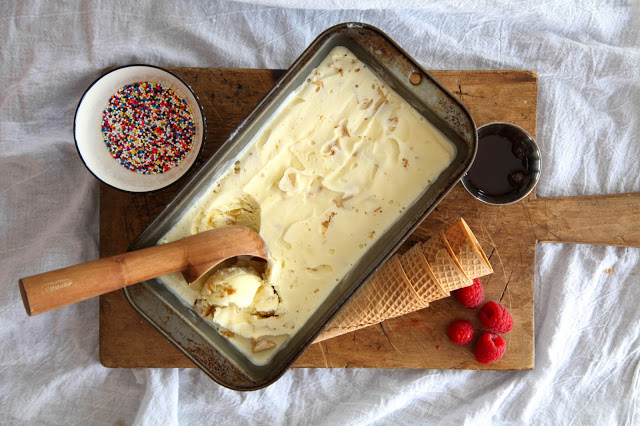
½ cup unsweetened coconut, toasted
6 oz. chocolate chips
2 Tbs. plus 2 tsp. coconut oil

Combine the passion fruit juice and 3 Tbs. of sugar in a small saucepan and heat over medium until the sugar dissolves. Transfer to a bowl and allow to cool.

In another small bowl, combine 3 Tbs. of the milk and the cornstarch and mix to make a slurry. In a large bowl, whisk the cream cheese until smooth. Set both aside.

Combine the rest of the milk, the cream, the rest of the sugar, and the corn syrup in a large saucepan. Bring to a boil, while stirring. Let the mixture boil for 4 minutes. Remove from the heat and slowly whisk in the milk and cornstarch slurry. Return to the heat and let boil for an additional minute.

Whisk the hot milk into the bowl of cream cheese until it’s smooth. Strain through a sieve if it’s a bit lumpy. Whisk in the yogurt and the passion fruit syrup. Transfer the mixture to a gallon freezer bag and close, squeezing out excess air. Fill a large bowl with ice water and submerge the bag with the frozen yogurt base in the ice water for 30 minutes.

Once the frozen yogurt mixture is cool, churn according to your ice cream maker’s instructions. While it churns, combine the chocolate and the coconut oil in a microwave safe bowl. Microwave for 30 seconds at a time, stirring after each round, until all of the chocolate is melted and mixture is smooth.


When the frozen yogurt is finished churning, stir in the toasted coconut. Transfer to a freezer safe container by layering spoonfuls of frozen yogurt with drizzles of the chocolate sauce until all of the frozen yogurt is in the container. You will most likely not use all of the chocolate sauce but this can be refrigerated and reheated for a later use. Place your frozen yogurt in the freezer and let it firm up overnight before scooping. Drizzle with additional passion fruit juice, if desired.

Honeycomb Ice Cream for my 100th Post!

I am very excited to say that this is officially my 100th post on Honeycomb. Just a month shy of when it all started 4 years ago, I can’t believe that number 100 is already here. I also can’t believe that, when averaged out, that means I’ve done one post about every 2 weeks. I thought I was way lazier than that so that’s just crazy.

It’s a bit of a strange feeling to get to this point though. I will admit that in the 4 years, there are have been many times where I simply thought about giving it all up. When I started, the food blog thing was certainly an up-and-coming fad but still not too widespread. I had these grandiose ideas that one day some fancy pants food magazine would give it a shout-out and the popularity would grow rampant. But after a long time of that not happening and food blogs becoming something that seemingly everyone and their mother had, I started to lose a bit of steam. What was the point if no one was reading it?

But every time I would get like that, something would pull me back. Maybe someone would tell me that they shared it with a friend or that they cooked one of the recipes and it turned out great. Something little but more than enough to make it all seem worth it again. The blog has changed a lot from post 1 to post 100. It started with a bit of a hippie health blog vibe, moving into angsty posts from my days spent trying to find a job, and shifting into what it is now which focuses heavily on the photography and seasonal eating with travel dining guides thrown in whenever I take a trip. I’m quite happy with where it is today and seeing how it has developed and I continue to be so glad for those moments that keep it all going!

So, to celebrate, what could be more appropriate than some honeycomb ice cream! This is probably my simplest ice cream yet but extremely satisfying. The ice cream base is straight up vanilla custard. It’s crazy sweet but unapologetically so. It gets a fantastic crunch and extra layer of flavor from handfuls of crushed-up honeycomb candy throughout. The best part is, the candy starts to melt a little in the freezer too, giving the ice cream a burnt sugar swirl. To balance out the sweetness, I highly recommend enjoying with some dark chocolate sauce and a sprinkle of some flaky sea salt (believe me, it’s fantastic) or some nice tart raspberries. And, since were celebrating here, rainbow sprinkles. Obviously.

Honeycomb Ice Cream
Makes about a quart
Recipe from Yossy Arefi via Food 52

Ingredients

For the Honeycomb
½ cup granulated sugar
¼ cup golden syrup or dark corn syrup
1½ tsp. baking soda
pinch of salt

For the Ice Cream
2 cups heavy cream
1 cup whole milk
1 cup sugar
4 egg yolks
1½ tsp. vanilla extract
pinch of salt

Begin by making the honeycomb candy. Line a baking sheet with parchment paper. In a medium saucepan, combine the sugar and syrup and stir until it becomes a paste. Place it over a medium heat. Let it cook and bubble away until the sugar is melted and the mixture is a dark maple color. Do not stir with a spatula but you can slowly tilt and swirl the pot occasionally. This should take about 5 minutes.

Once ready, whisk in the baking soda and salt. It should bubble and foam. Quickly pour the mixture onto the sheet pan. It doesn’t matter if it’s smooth, just get it all onto the sheet as fast as possible. Let cool completely before touching again. Once cool, break up into small dime-size pieces. Store at room temp in an air-tight container until ready.

To make the ice cream, combine the cream, milk, and sugar in a medium saucepan. In a separate bowl, whisk the egg yolks together. Place the saucepan over medium heat and stir until the sugar is dissolved. When the mixture starts to get small bubbles around the outside edge of the pot, remove from the heat. Slowly pour a little bit at a time into the bowl of egg yolks, while whisking. Once you’ve added about a half-cup, pour the warmed egg yolks back into the pan with the milk mixture.

Return the saucepan to the stove over medium heat. Continue cooking and stirring constantly until the mixture is thickened and coats the back of a spoon. This will take about 4-5 minutes. Remove from the heat and stir in the vanilla and salt. Pour into a container and let sit in the fridge overnight.

Then next day, churn the ice cream according to the machine’s instructions. Just before the ice cream is done churning, add in about ¾ cup to 1 cup of the honeycomb candy. Transfer the ice cream to a freezer-safe container and let freeze for at least 3 hours before eating. As mentioned above, it’s agreat with chocolate sauce, sea salt, and berries.

Chai Tea Ice Cream

One of the few redeeming features of colder weather is the excuse to spend the evenings and weekends hidden somewhere under a blanket, lost in a book and with a constantly replenished hot drink in hand. My usual drink of choice is vanilla rooibos tea but I’ve also always been a fan of hot chocolate. I used to go for the classic packet of Swiss Miss, dehydrated mini marshmallows and all, but have favored the Aztec style “drinking chocolate” in the more recent years, those teeny cups of almost entirely melted chocolate with a tad bit of milk to thin it out and sugar and spices to sweeten and flavor it. However, the one drink that I’ve always loved the idea of but never really liked once I was drinking it is chai tea. It seems so perfect in concept; you can’t go wrong with warm frothy milk infused with a mild black tea and warm spices. Yet, the store-bought chai tea bags are always so tannic and the spices totally overwhelm the delicacy of the tea. There are also those cardboard cartons of chai tea concentrate but they are so loaded with sugar I feel like I’m drinking syrup. I am aware that I could have easily looked up a recipe and made it myself, but with so many disappointing experiences with chai tea, I guess I never really felt inspired to pursue it.

Recently, however, my mom and I went to brunch and got one of the best yet simple desserts I think I’ve ever tried. It had an apricot vanilla panna cotta with white chocolate shortbread crumbles, a bruleed apricot (yes it did have a crispy sugar crust on it) and a quenelle of 5-spice ice cream on the side. One spoonful containing a little bit of each of the 4 components together was nearly magical but each separate component by itself was quite good as well. I was especially intrigued but the 5-spice ice cream. It was delicious, yet I’ve always found 5-spice to have a little bit too much anise flavor for my taste. This reflection of course then led to the idea that maybe I should make my own spice ice cream but a little more geared to my own preferences, which then led to the light bulb moment of, “Hey! I should make chai tea ice cream.” Maybe I never had much luck with the drink but things could be different when translated into frozen form, right?

So, when temperatures soared to a very unseasonable 90 degrees this past weekend and the last thing that I had on my mind was burrowing under the covers with a warm cup of tea, my ice cream plan seemed just like the right idea. I used the basic ice cream base from Jeni’s Splendid Ice Creams at Home and played around with it to get the chai tea flavor right. The flavor that resulted is just how I’ve always dreamed that chai tea would be like but of course in cold solid format. The stand out flavor is the tea itself. It imparts very delicate rosy floral notes and an even stronger caramel, honey-like flavor. After the taste of tea comes the sweetness of the cream itself and finally, standing in the background, the flavor of the spices. The cinnamon and clove are warming, the peppercorn and anise add a slight savoriness to offset the sweetness, and, my favorite, the cardamom, adds a smoky floral essence. The texture is lovely too; it’s more so like gelato in its dense creaminess that becomes almost custardy when it begins to melt, despite not having in eggs in it. Though I wont be giving up on my rooibos anytime soon, I think that my success in the chai flavor department has convinced me that I’m finally ready to give hot chai tea a try again, totally made from scratch this time…at least once it actually starts to feel like autumn around here. Anyone have any recipe suggestions?

Chai Tea Ice Cream
makes about 1 quart
adapted from Jenis's Splendid Ice Creams at Home

Ingredients
2 cups whole milk
1 Tbs + 1 tsp cornstarch
1½ oz. softened cream cheese
1/8 tsp sea salt
1¼ cups heavy cream
2/3 cups white granulated sugar
2 Tbs light corn syrup
¼ cup English breakfast tea leaves
2 cinnamon sticks
10 black peppercorns
10 whole cloves
2 cardamom pods, crushed open to expose the seeds
¼ tsp 5-spice powder
1 tsp vanilla extract

Mix 2 Tbs of your milk with the cornstarch in a small bowl to form a slurry. In a large glass bowl, whisk the cream cheese with the salt until smooth. Set these aside.

Combine the remaining milk, heavy cream, sugar, and corn syrup in medium sized saucepan. Heat on medium, while stirring, until steam starts to rise from the milk and it is warm to touch. Add the cinnamon sticks, peppercorns, cloves, cardamom pods, and 5-spice powder. Cover with a lid and set aside to infuse for 45 minutes.

Once you are ready to continue, fill a large bowl with ice water and set aside. Remove the lid to your saucepan and set it on medium high heat. Bring to a boil. Once boiling let it continue to rapidly boil for 4 minutes. Remove from the heat, add the tea, cover and set aside to steep for 10 minutes. Strain the mixture using a fine sieve to remove the tea and spice from the milk. Return the milk mixture to the saucepan and bring back to a boil. Once boiling, whisk in the cornstarch slurry and boil for 1 more minute.

Carefully whisk the hot milk into the bowl with the cream cheese and whisk until smooth. Stir in the vanilla extract. Pour the mixture into a gallon zip-lock bag, and place the sealed bag into the bowl of ice water. Let chill in the water for 30 minutes, replenishing ice if needed.

Once chilled, snip a corner of the bag and pour the ice cream base into your ice cream maker, churning according the manufacturer’s instructions. Once frozen, pack in a freezer safe container and freeze for at least 4 hours before eating.

Mocha Porter Ice Cream

Oh gosh. It’s that time of year. It’s ice cream season again. Not that I stopped eating ice cream all winter or anything; now I’ll just eat 2-3 times as much. I blame Jeni and David for the overindulgence. If their creations weren’t blatantly staring me in the face from their place on the bookshelf all day, this blog wouldn’t always have an almost monthly spiel on how much I love the stuff. This may be the sixth ice cream post I’ve done in 10 months of this blog’s existence but trust me, there will be more. Deal with it.

I’ve become a bit of a beer fan in the last few months. My college town was really into the whole craft beer industry so it was hard to go to any restaurant or bar and resist trying some of the crazy beers they’d have for tap takeovers and steal-a-pints. I never really used to like alcohol (or drink it for that matter) until I turned 21. Then I began to pair wines and beers with food at restaurants and saw I was missing out on a really interesting, scientific, and delicious art form. And, as with most things, I seem to be drawn to the sweeter brews: porters, stouts, wheats. Back on St. Patrick’s Day I saw so much hype about Guinness floats (Guinness poured over vanilla ice cream). I tried it. It was amazing. From that moment on I scoured the Internet in search of some kind of beer ice cream and of course it all came back to Jeni and her wild concoctions. In her book she has a recipe for a Kona stout ice cream so I took that, a bottle of Tommyknocker Cocoa Porter, and made what I think is my favorite among the ice creams I’ve tried since the dawn ofmy ice cream machine.

Let me introduce you to Mocha Porter Ice Cream.

This ice cream takes all of the good aspects of a mocha frappuccino, the strong and slightly bitter coffee flavor complicated slightly by chocolate undertones, adds beer, and turns what is usually is watery icy beverage into decadently smooth and rich ice cream. Despite its high water content from the beer, the ice cream is surprising creamy yet there is just enough slight iciness that is somehow feels cooler and more refreshing on the tongue. The alcohol softens it up so it can be scooped straight from the freezer, which is especially nice when I’m stealing small spoonfuls about every thirty minutes. The beer I used was a porter flavored with cocoa and honey so the ice cream gets slight chocolaty and floral notes along with the beer’s natural strong maltiness. For the coffee, the main flavor component, I used Caribou Medium Blend coffee, which has chocolate flavors, to complement everything else going on. I have a feeling that this batch is not going to stick around for too long. Between my mom and I and the gorgeous weather we are having, I’m going to give it about a 3-day life span. Time to get buzzed!

Mocha Porter Ice Cream
Slightly adapted from Jeni’s Splendid Ice Creams at Home
makes a little more than 1 quart

Ingredients
2 cups whole milk
1½ Tbs cornstarch
3 Tbs softened cream cheese
1/8 tsp. fine sea salt
1¼ cups heavy cream
2/3 cup sugar
2 Tbs light corn sypup
2½ Tbs coarse ground coffee, medium or dark roast (I used Caribou Medium Blend)
½ dark porter or stout beer (I used Tommyknocker Cocoa Porter)
1 tsp vanilla extract

To prep, mix two tablespoons of the milk with the cornstarch until smooth. Set aside. Whisk the cream cheese with the salt in a large heatproof bowl and set aside. Prepare an ice bath in a large bowl.

Combine the rest of the milk, the cream, the sugar, and cornstarch in a large saucepan. Bring to a boil and let boil for 4 minutes. Remove from heat and stir in the coffee grounds. Let the mixture steep for 5 minutes. Pour the mixture through a cheesecloth line sieve into another bowl to remove the coffee grounds. Squeeze the cheesecloth to extract as much flavor as possible. Return the liquid to the saucepan and bring back to a boil. Once boiling, whisk in the cornstarch slurry and cook for 1 more minute. Remove from the heat.

Whisk the milk into the cream cheese mixture until well combined and smooth. Stir in the porter and the vanilla. Transfer mixture to a gallon plastic bag and submerge in the ice bath for about 30 minutes or until the ice cream mixture is well chilled. Pour the mixture into the ice cream maker and freeze according to manufacturer’s instructions. Pack into a storage container and freeze until firm, about 4 hours, before eating.

The Art of Science

Fun fact: I’m taking a sculpture class for my final semester at college.

A word of advice: Never, ever, EVER, assume that sculpture is an easy elective.

As much as I love and appreciate and enjoy submerging myself in the realm of good design by means of Pinterest, design blogs, beautiful books, etc., the whole art thing is not instinctively a part of my nature. In fact graphic design and writing, until about two years ago when I forced myself to pursue these subjects, were dreaded chores for me. They are much more intuitive now that I have studied and lived them but the truth is, I am naturally a science and math person. I like straight answers, orderliness, functionality, and dependency. I like to work with available things and patterns rather than draw inspiration out of nothingness. And everything that I represent in my nature is everything that sculpture is not.

I seriously went in imagining that I was going to make cool furniture and or creative table settings…that I was going to be building forts or something. It’s the exact opposite. So far we have made hybrid vegetable-like objects from plaster (the reason why I don’t show my hands in public anymore) and are now turning one of those into huge sized metal structure built from endless pieces of steel rod. So yes, that means welding, and sanding metal. That means that I have thus far stood in showers of sparks, singed my hair, and donned an incredibly stylish ensemble of leather and Darth Vader facemask. For the past two weeks I have been a hot sweaty mess with permanent helmet head.

And though the physical labor involved in sculpture is a bit rough at times, it is actually the conceptualizing in this class that is so difficult. Apparently sculpture is meant to be an art form where you proceed with intuition, enjoy the journey while forgetting the finished product, moving with unrestrained, unplanned, sometimes haphazard artistry. So for someone like me who likes instruction, formulas, and set goals (though I think the process and innovation is important too) you can see how this is difficult.

That is why it is so nice to know that after four straight days of rampant welding, there is always something I can turn to for a dose of formulaic stress release. That is why, even when it is below freezing outside, I still make ice cream. Baking, and especially ice cream making, is truly a science. That is why we get along so well. Ice cream likes its fat, water, and sugar contents a certain way and I respect that. I give that to the ice cream and in return I get something that comes out exactly how it should be.

This grapefruit and hibiscus flavored frozen yogurt is so smooth and dense and although less in fat than standard ice cream, is just as creamy. The tart and citrusy flavor is very refreshing that I almost consider it a palate cleanser more than dessert (that’s how I justify eating froyo in the dead of winter). And during this season where we are prone to cook meals with a bit more heartiness and maybe a little more garlic, onion, and spice, it’s nice to have this to lighten up the richness of the meals. And of you can’t neglect to admire the fact that it is bright fuchsia, imparted from dried hibiscus, which also brings about a delicate floral note to the zingy grapefruit. Greek yogurt adds a zippy quality too but don’t worry, it is plenty sweet.

So, though some may consider grinding away on solid steel or relishing in freeform art for their stress relief, I’ll stick to my frozen yogurt, thanks.

Grapefruit Hibiscus Frozen Yogurt
recipe from Jeni’s Splendid Ice Creams
makes 1 quart

Ingredients:
1¼ cups 2% greek yogurt (I used Chobani)
1½ cups whole milk
2 Tbs. cornstarch
4 Tbs. softened cream cheese
½ cup heavy cream
2/3 cup sugar
¼ cup light corn syrup
strips of zest from 1 grapefruit
grapefruit syrup (recipe follows)

Grapefruit syrup
1 grapefruit
2 Tbs. sugar
¼ cup dried hibiscus flowers

First make the grapefruit syrup. Remove the zest from the grapefruit with a vegetable peeler making long strips. Set aside for later use. Cut open the grapefruit and squeeze out ½ cup of the juice. In a small saucepan, combine the grapefruit juice with the 2 Tbs. of sugar. Bring to a boil over a medium high heat, stirring so that the sugar dissolves. Once boiling, remove from heat and add in the hibiscus flowers. Let the mixture sit for 10 minutes. Strain the syrup through a sieve and set aside.

To prep the frozen yogurt, mix 3 Tbs. of the milk with the cornstarch and stir to form a slurry, whisk the cream cheese in a medium bowl until smooth, and prepare and ice bath. Set all aside.

Combine the rest of the milk, the cream, the sugar, corn syrup, and grapefruit zest in a saucepan. Bring to a boil over medium high heat and let boil for 4 minutes. Remove from heat, gradually whisk in the cornstarch slurry, and return to the heat, cooking and stirring for a minute more.

Slowly whisk the hot milk mixture into the bowl with the cream cheese. Add the Greek yogurt and the grapefruit syrup and stir until combined. Pass through a sieve to remove any lumps and the grapefruit zest. Pour the mixture into a gallon Ziploc bag and submerge in the ice bath for half an hour. Once fully chilled, freeze in your ice cream machine according to manufacturers instructions. Pack in freezer safe container and let freeze for four hours until firm before serving.