Spanish Style Turkey Meatballs with Almond Sauce

I’ve been meaning to write about this one for a really long time. I just never really knew what to say about it exactly.

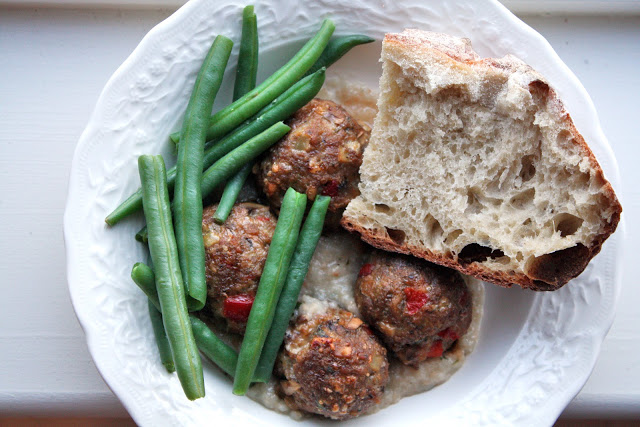
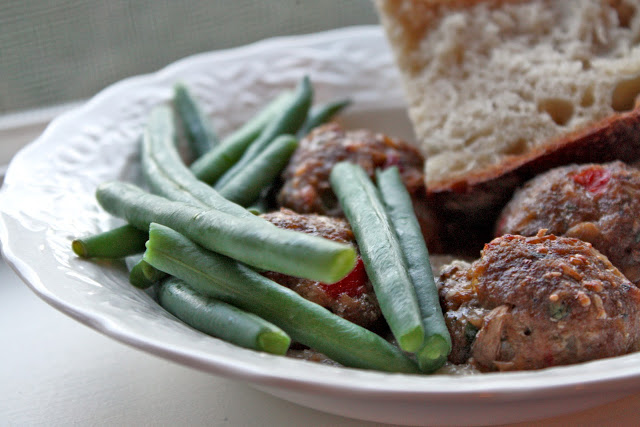
It’s a wonderful dish, full of savory Spanish style flavors and aromatic with the scent of lemon and fruity wine. It uses ground turkey too so I guess it’s a bit healthier without screaming “diet-food” in the least bit. And of course it’s convenient because the meatballs are baked rather than pan-fried so there is no need to worry about an overcrowded pan of half burnt meatballs falling apart every time you try to flip them over. The meatballs with the almond sauce are perfectly fine on their own but are even better with a nice wedge of crusty bread to mop up the juices and something fresh and green to dip in the remaining sauce.  I ate it for four days straight without getting tired of it and I think it’s a really great way to change up an ordinary weeknight meal.

So why had its image been sitting unused in my iPhoto gallery for the past two months? It just really had no story. It’s not passed down, not traditional to my heritage or upbringing or reminiscent of anything from my childhood. The recipe just sort of came out of nowhere and happened to turn out really quite well. It still has no story and I have yet to recreate it for my family. I’m the only one who has tasted this gem, which is why I’m now suddenly itching to release this dish to the world instead of hoarding it to myself until I think of what to say about it. Enjoy.

Spanish Style Turkey Meatballs with Almond Sauce
serves 4 meatballs are original and sauce is adapted from this

This would be a perfect thing to bring to a potluck/tapas sort of party if you make the meatballs smaller and serve with toothpicks in a pool of the sauce. It would be nice on cooler pre-summer nights accompanied by a glass of the leftover wine used to make the dish. Of course you can certainly try it with other sides like sautéed greens or asparagus rather than the French beans if you’re going for a more seasonal thing too.

Ingredients
2 Tbs. olive oil
½ of an onion, diced
1 cup cremini mushrooms, diced
1 clove garlic, minced
1/3 cup chopped roasted red peppers either jarred or homemade (instructions here)
2 Tbs. minced parsley
1 tsp. dried oregano
1 tsp. paprika
2 slices white bread, crusts removed
1¼ cups chicken or vegetable stock
1 cup plus 2 Tbs. Pinot Grigio or another fruity, dry white wine
1 lb ground turkey
zest of 1 lemon
2 tsp. sugar
¼ cup blanched almonds
salt and pepper to taste
a loaf of crusty white bread and greens to serve (optional)

For the meatballs, preheat the oven to 350 degrees. Heat 1 tablespoon of the oil in a skillet over medium heat. Add the onion, mushrooms, garlic and salt and pepper to taste and sauté for about 5-7 minutes until tender. Transfer to a large bowl to cool slightly and set aside. Tear up one piece of the bread into a bowl and pour over ¼ cup of the stock and 2 tablespoons of the wine and mash with a fork until the bread is completely saturated. Set aside for 5 minutes.  Add the roasted red pepper, parsley, oregano, paprika, and soaked bread with liquid to the onion and mushroom mixture and stir to combine. Add the turkey to the mixture and mix until just combined evenly. Diving into 16 balls space them evenly on a parchment lined baking sheet. Bake for 25-30 minutes until golden and cooked through.

While the meatballs bake, make the almond sauce. In a large skillet, bring the remaining stock and remaining wine to a boil. Add the lemon zest and sugar and reduce to a simmer. Meanwhile, in another skillet, heat the other tablespoon of oil over medium high. Tear up the other piece of bread into the skillet along with the almonds and fry until the bread and almonds are golden. Set aside to cool slightly and then whiz them in a food processer until you have a fine powder. Add the almond and bread powder to the simmering stock and stir. Simmer over low heat, stirring occasionally, for about 10 minutes adding additional liquid as needed.

Serve the meatballs with the sauce with a wedge of a rustic country loaf and greens of your choice.

Mocha Porter Ice Cream

Oh gosh. It’s that time of year. It’s ice cream season again. Not that I stopped eating ice cream all winter or anything; now I’ll just eat 2-3 times as much. I blame Jeni and David for the overindulgence. If their creations weren’t blatantly staring me in the face from their place on the bookshelf all day, this blog wouldn’t always have an almost monthly spiel on how much I love the stuff. This may be the sixth ice cream post I’ve done in 10 months of this blog’s existence but trust me, there will be more. Deal with it.

I’ve become a bit of a beer fan in the last few months. My college town was really into the whole craft beer industry so it was hard to go to any restaurant or bar and resist trying some of the crazy beers they’d have for tap takeovers and steal-a-pints. I never really used to like alcohol (or drink it for that matter) until I turned 21. Then I began to pair wines and beers with food at restaurants and saw I was missing out on a really interesting, scientific, and delicious art form. And, as with most things, I seem to be drawn to the sweeter brews: porters, stouts, wheats. Back on St. Patrick’s Day I saw so much hype about Guinness floats (Guinness poured over vanilla ice cream). I tried it. It was amazing. From that moment on I scoured the Internet in search of some kind of beer ice cream and of course it all came back to Jeni and her wild concoctions. In her book she has a recipe for a Kona stout ice cream so I took that, a bottle of Tommyknocker Cocoa Porter, and made what I think is my favorite among the ice creams I’ve tried since the dawn ofmy ice cream machine.

Let me introduce you to Mocha Porter Ice Cream.

This ice cream takes all of the good aspects of a mocha frappuccino, the strong and slightly bitter coffee flavor complicated slightly by chocolate undertones, adds beer, and turns what is usually is watery icy beverage into decadently smooth and rich ice cream. Despite its high water content from the beer, the ice cream is surprising creamy yet there is just enough slight iciness that is somehow feels cooler and more refreshing on the tongue. The alcohol softens it up so it can be scooped straight from the freezer, which is especially nice when I’m stealing small spoonfuls about every thirty minutes. The beer I used was a porter flavored with cocoa and honey so the ice cream gets slight chocolaty and floral notes along with the beer’s natural strong maltiness. For the coffee, the main flavor component, I used Caribou Medium Blend coffee, which has chocolate flavors, to complement everything else going on. I have a feeling that this batch is not going to stick around for too long. Between my mom and I and the gorgeous weather we are having, I’m going to give it about a 3-day life span. Time to get buzzed!

Mocha Porter Ice Cream
Slightly adapted from Jeni’s Splendid Ice Creams at Home
makes a little more than 1 quart

Ingredients
2 cups whole milk
1½ Tbs cornstarch
3 Tbs softened cream cheese
1/8 tsp. fine sea salt
1¼ cups heavy cream
2/3 cup sugar
2 Tbs light corn sypup
2½ Tbs coarse ground coffee, medium or dark roast (I used Caribou Medium Blend)
½ dark porter or stout beer (I used Tommyknocker Cocoa Porter)
1 tsp vanilla extract

To prep, mix two tablespoons of the milk with the cornstarch until smooth. Set aside. Whisk the cream cheese with the salt in a large heatproof bowl and set aside. Prepare an ice bath in a large bowl.

Combine the rest of the milk, the cream, the sugar, and cornstarch in a large saucepan. Bring to a boil and let boil for 4 minutes. Remove from heat and stir in the coffee grounds. Let the mixture steep for 5 minutes. Pour the mixture through a cheesecloth line sieve into another bowl to remove the coffee grounds. Squeeze the cheesecloth to extract as much flavor as possible. Return the liquid to the saucepan and bring back to a boil. Once boiling, whisk in the cornstarch slurry and cook for 1 more minute. Remove from the heat.

Whisk the milk into the cream cheese mixture until well combined and smooth. Stir in the porter and the vanilla. Transfer mixture to a gallon plastic bag and submerge in the ice bath for about 30 minutes or until the ice cream mixture is well chilled. Pour the mixture into the ice cream maker and freeze according to manufacturer’s instructions. Pack into a storage container and freeze until firm, about 4 hours, before eating.

Then, All of the Sudden...

...I became a James Madison University Alum.

After four of the most challenging, rewarding, terrifying, enlightening, self-discovering, mind-numbing, but sometimes, just plain fun years of my life, I graduated on Saturday with a degree in Media Arts and Design and a minor in Studio Art/Graphic Design. I’m still not sure how I feel about it quite yet. For so long I thought I would experience nothing but joy for completing this journey but now a part of me wishes it hadn’t ended. I now face a vast world on unknown instead of the friendly familiar. Time will tell what happens next, I suppose. For now, I’ll take a little while to relax, mull things over, unpack, and relish in my new title as a college graduate.

In the weeks leading up to moving out of my apartment I had a goal to use up as much of the remaining bits of food shoved into the corners of the pantry, fridge, and freezer. I did a pretty good job. By the time I moved out all I had left in the refrigerator was half a tube of anchovy paste, vegetable bouillon paste, a jar of tahini, mayonnaise, and an old lump of Parmesan cheese. There is something slightly satisfying about whipping up a dish out of the meager remains of the fridge and leaving clean and nearly empty shelves behind. That’s what I did about two weeks ago and ended up with a fairly original take on two spring classics.

I have a difficult time getting through a whole loaf of bread by myself before it goes stale so I usually take about a third of it and freeze it for later use. I noticed I had about four different bread nubbins sitting in my freezer and finally decided to use them to make a good savory and cheesy bread pudding. I searched around the kitchen for more flavor inspiration. Half a bag of frozen corn and frozen lima beans. A wedge of Swiss cheese. Some sundried tomatoes. And finally, a large bunch of Swiss chard I got from the farmers market because I couldn’t resist its pink, yellow, orange, and green stems. It all started to sound like a succotash to me. So it hit me: savory succotash bread pudding. I also like to call it rainbow pudding because of its plethora of colors. I know it sounds like it could be something including a Jell-O packet and food coloring but believe me, my rainbow pudding is waaay better.

It is comforting, but it also not quite so indicative of cold winter nights. With the fresh flavors and bursts of color, this veggie-laden bread pudding is what springtime is all about. The beans, corn, and sundried tomatoes are crunchy and sweet while the chard and basil offset it with a bit of bitterness and earthiness. The bacon and Swiss come together to turn it into something just a little bit more indulgent and add smokiness and a slight bit of nutty tang. I made a nice big batch so that I could easily heat up a portion throughout the week as I worked on final projects and studied for my tests. It may have originated from an assortment of leftovers but a pot of bread pudding gold is what it became at the end.

P.S. I made a really fun cookbook this semester for my final sculpture project. You can view it here. If you are interested in buying a copy there is a purchase link at the bottom of the right sidebar on this blog. Enjoy!

Savory Succotash “Rainbow” Pudding
serves 4

Now just to warn you, I am a newly converted fan of bread pudding. I was always turned off by the soggy bread aspect until one time when I got bread pudding that was a bit more dry than usual and found that to be quite delicious. I especially like the crunchy top layer. So just to warn you, this recipe does make a rather dry pudding. If you like your bread super custardy and soggy, then feel free to add as many extra splashes of milk that you would like. Also, you will see that this recipe mostly uses evaporated milk. It's the key to making a rich and sturdier bread pudding without the extra fat.

Ingredients
5 cups of fresh rustic bread, cut into 1 inch cubes
1 can 1% or 2% evaporated milk
1 bunch swiss chard
1 Tbs. butter
1 cup frozen or fresh corn, thawed if frozen
½ cup frozen lima bean, thawed
1/3 cup chopped sundried tomatoes in oil
4-5 slices bacon, cooked and chopped into ½ inch bits
2 eggs, lightly beaten
½ cup loosely packed chopped basil
4 oz shredded swiss cheese
¼ - ½ cup lowfat milk*
salt and pepper
pinch of red pepper flakes

*note: add lesser amount if you like dry bread pudding and more if you like a wetter bread pudding.

You don’t even need to add it if you don’t want to

First prepare all of your ingredients. Butter a 9X9 in. glass baking dish. Heat the oven to 350 degrees. Arrange the bread cubes on a sheet tray and place in the oven for 10 minutes until the bread is lightly toasted. Remove from the oven and let cool. Pour the evaporated milk into a small saucepan and bring to a boil. Once boiling, remove from heat and set aside.

Wash and chop the Swiss chard and cook in a steamer basket positioned over a pot with about 1 inch of boiling water. Cover the pot and steam until the chard is tender. Once cooked, place the chard in a clean kitchen towel or cheesecloth and squeeze out some of the excess moisture. Set aside to cool some. In a frying pan, heat the butter over medium heat. Add the corn and lima beans and season with salt and pepper. Sauté for about 5 minutes until it just starts to get some color. Transfer to a bowl to cool slightly.

Pour the bread cubes into a large bowl. Pour over the evaporated milk and stir to coat. Add in the cooled Swiss chard, the sautéed corn and lima beans, the chopped sundried tomatoes, and the bacon. Stir to combine. Season the eggs with salt and pepper and mix the basil into the eggs. Add to the bowl with the bread and stir again to coat everything with the eggs. Finally, add the Swiss cheese and combine thoroughly. Season once more with salt and pepper and a pinch of red pepper flakes, if desired. Add ¼ to ½ cup more of regular lowfat milk if it looks to dry for your preference (see note). Transfer to the baking dish. It may seem like too much but pack it in and it should all fit. Bake at 350 degrees for 45-50 minutes until firm. Cover the top with foil partway through if it seems to be browning too quickly. Cut into four portions and serve immediately.

Victoria Sandwich

This week marks the beginning of the ends. Every day from now until next Saturday I will be exclaiming to anyone who cares to listen that I am doing something for the last time ever. The other day was my last time to have a serious case of the Mondays in college. Friday will be my last day of classes for good! Next Wednesday I will take the final final and then, Saturday May 5th, I will sit on out Quad one last time and throw my purple cap into the air, marking the beginning of the next stage of life. Cue Pomp and Circumstance…now.  

As I celebrate my lasts I also can’t help but reminisce of the pasts. I often tell people that my college experience lasted only 2 years. I tend to ignore the fact that freshmen and sophomore year ever happened. I was a pretty miserable and homesick wreck and rather lonely. I didn’t find a true sense of belonging and meaning to my college experience until the beginning of my junior year when I studied in London for 4 months. I lived with 27 of the most amazing people as well as the team of outstanding faculty and staff for the program and they are the ones who I relied and depended on as I began to make a transformation into the person who I am today. London is where I found independence, where I found my passions for food, travel, and cultural experiences. As cliché as it sounds I came back a changed, more confident and self-assured person. I felt as if I was ready to graduate then, that nothing back in this small town could further my knowledge after what I had just seen abroad. But I was wrong. The past year and a half have been amazing as well and nothing like those first two awful years. With newfound sense of self and of course my London family and our memories alongside me, the remaining time at college has flown in a blur of all-around contentment.

This past weekend I had my study abroad friends over for a farewell gathering potluck, We ate, drank mimosas out of plastic cups, reminisced and subsequently laughed over the many ridiculous things that happened during our four months together, and celebrated our soon to come graduation. These people are my family. We saw each other at our best and worst of times, in our fragility and homesickness but also our sheer moments of bliss. We had drama but, more often that not, we had laughter and we watched each other mature into a higher state and more aware state of ourselves. We are so closely bound by this and therefore, I will miss this group immensely. 

For our potluck I made this cake, a classic English dessert called a Victoria Sandwich, named after the Queen’s supposedly favorite teatime snack. I know I’ve mentioned several times here that I am not much of a cake person but this could be the cake to totally contradict that statement. The cake itself it mentioned various times on the Internet. The Wednesday Chef just made it but I remember seeing it originally on Orangette titled “busy day cake”.  I don’t know why but I always wanted to try this one out. Perhaps I enjoyed the non-fussy qualities, the fact that it is best by itself, in all of its un-iced glory. I liked how every picture I saw of it seemed to be ethereally light and fluffy. It looked like it was not too sweet, like something that would be perfectly excusable as a breakfast item. It lived up to every visually created extraction I set. It was meltingly tender, wonderfully fragrant of vanilla and nutmeg, and I made it into a perfect springtime treat with the addition of the strawberries and cream (in my honest opinion few things are greater than strawberries and fresh whipped cream). It is simple and humble and, with its enormous sinkage in the middle, it is just ever so pleasantly frumpy. This cake is London in essence.

Victoria Sandwich Cake
serves 12-16
cake recipe from The Wednesday Chef and Orangette via Edna Lewis

Ingredients
1 stick (1/2 cup) softened butter
1 1/3 cups sugar
3 large room temperature eggs
2 tsp. vanilla extract
2 cups sifted cake flour
2 Tbs. cornmeal
½ tsp. salt
2½ tsp. baking powder
¼ tsp. nutmeg
½ cup buttermilk
1 cup heavy whipping cream
8 oz strawberries, washed, hulled, and sliced thin
1 tsp. sugar

Preheat the oven to 375 degrees. Butter a nine-inch cake pan and line the bottom with a parchment round. Butter the parchment too.

In a standing mixer, beat together the butter and the sugar on high speed until fluffy, 3 minutes. Add the eggs one at a time and then add the vanilla. Scrape the bowl to loosen the bits sticking at the bottom.

In a bowl, combine the cake flour, cornmeal, salt, baking powder, and nutmeg. Turn the mixer onto low and add the flour mixture in 3 parts while adding half of the buttermilk in between each flour addition (you should start and end with the flour). Mix until combined. Pour the batter into the prepared pan and smooth the top.

Bake the cake for about 30 minutes until an inserted toothpick comes out clean. The top will brown quickly so you may need to cover it with foil at some point in the baking. Remove from the oven and let cool in the pan for 5 minutes. Invert onto a baking rack and let cool completely.

Combine the strawberries with the sugar and stir to combine. Set aside for at least 10 minutes to allow the strawberries to release some juices. Whip the heavy cream with a mixer or by hand until you have stiff peaks. Once the cake is cool. Use a serrated knife to cut the cake into two layers. Remove the top and set aside. On the bottom layer of the cake arrange the strawberries overtop making sure to pour over the good juices. Spread the whipped cream over the strawberries and place the top layer of the cake over the cream. Dust with powdered sugar. (The cake itself can stay out at room temperature but once you add the cream it needs to be refrigerated. Therefore, I recommend assembling the cake just before you intend to serve it so that the cake can be at room temperature...but its still good cold…at midnight).

Hi, April Favorites

Oy!

I’ve been wracking my brain for the perfect word to describe the past few weeks but that was all I could come up with.

Oy!

Though I’m sure Buh! Gah! or Kwekjfgkgs! could work as well.

Senioritis has come at me full tilt. On more than one occasion this week I have sat at my desk with a book in front of me, intending to do my required reading, yet a strange force prevents my hand from ever lifting up a page. Meanwhile final projects have overtaken my life but luckily I actually have an interest in those so it’s been a good kind of busy. The film festival I worked on coordinating since October started on Thursday and it is finishing up tonight. So hopefully within the next few days the crick in my neck will disappear, my shoulders will no longer represent Quasimodo, my heart won't feel panicky anymore and I will instead be saying 

Phew!

Meanwhile I’d like to give you some links I’ve been stockpiling for the last two months and also want to link you to this recipe here

I made the recipe exactly as Sara did (except I used Mahi-Mahi instead of cod) so I feel no need to repeat it. It’s a great segue recipe from winter to spring. The fish is light, lemony and refreshing and, as my fish craving increase with the rise of warm weather, much enjoyed. But nestled in heap of the polenta, the dish still carries comforting qualities. The leftover polenta can also be baked into awesome little croutons that I sprinkled on a Caesar salad one day and tomato soup the next.

And I will leave you with this…

21 DAYS TIL GRADUATION!

Hurrah!

Stop motion animation is quite possibly the greatest art form there is...especially when it has to do with food.

A modern rustic barn and an amazing ex-brewery loft

Paint for decorating kitchenwares that you apply and bake permanent...nontoxic and dishwasher safe too

Smart puppy and a silly puppy

The coolest people in food

Delicious pantone and eggy pantone

Could be very handy

Is sous-vide cooking genius or cheating?

Edible typography by Anna Garforth (take a look at her other work too, it's amazing)

The cauliflower mash looks like heaven (and of course the chicken does too)

Recently picked up some Belvoir Elderflower Cordial at Williams Sonoma and I plan to make this

and finally, the next ice cream on my to-make list